
Project Pandorum
Devlog Process


well this will be a large devlog, i will try to explain many things of the process of creation hope you like it and maybe learn something x3
Day 1

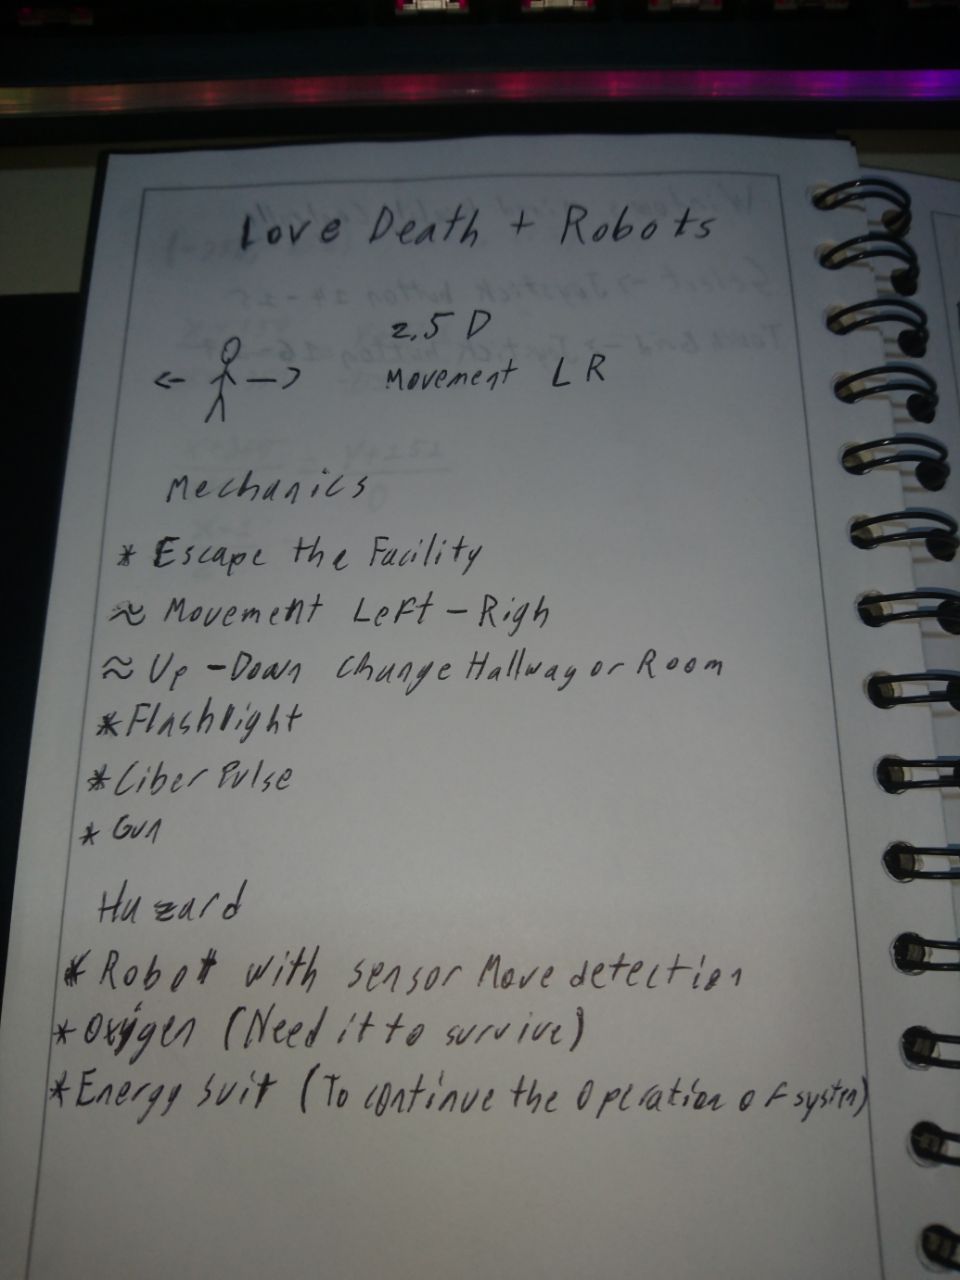
every thing begins in the paper, this was the SECOND IDEA, the first one was planned to be a card game, but to be safe in COPYRIGHTS was discarted, but maybe y create the game for myself and some others one e.e
anyways, we start thinking and writting things on paper before start, the beginning of the idea was a human escaping from a facility avoiding robots with sensor movements and similars, was planned to be in 2.5D.
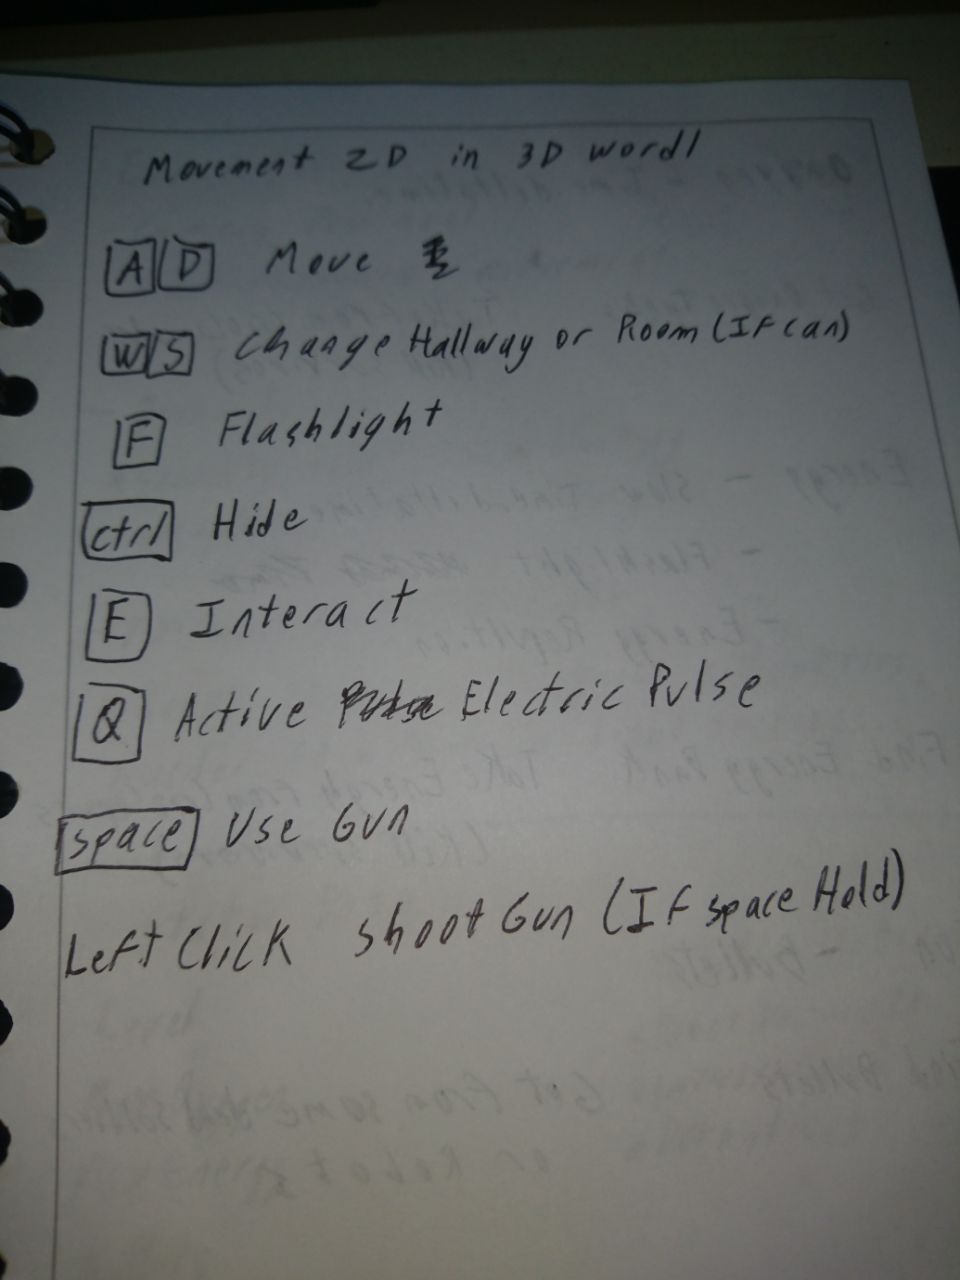
Here you can see how i planned to be the controls of the player, with this mechanics and ideas ready, was time to enter to unity.
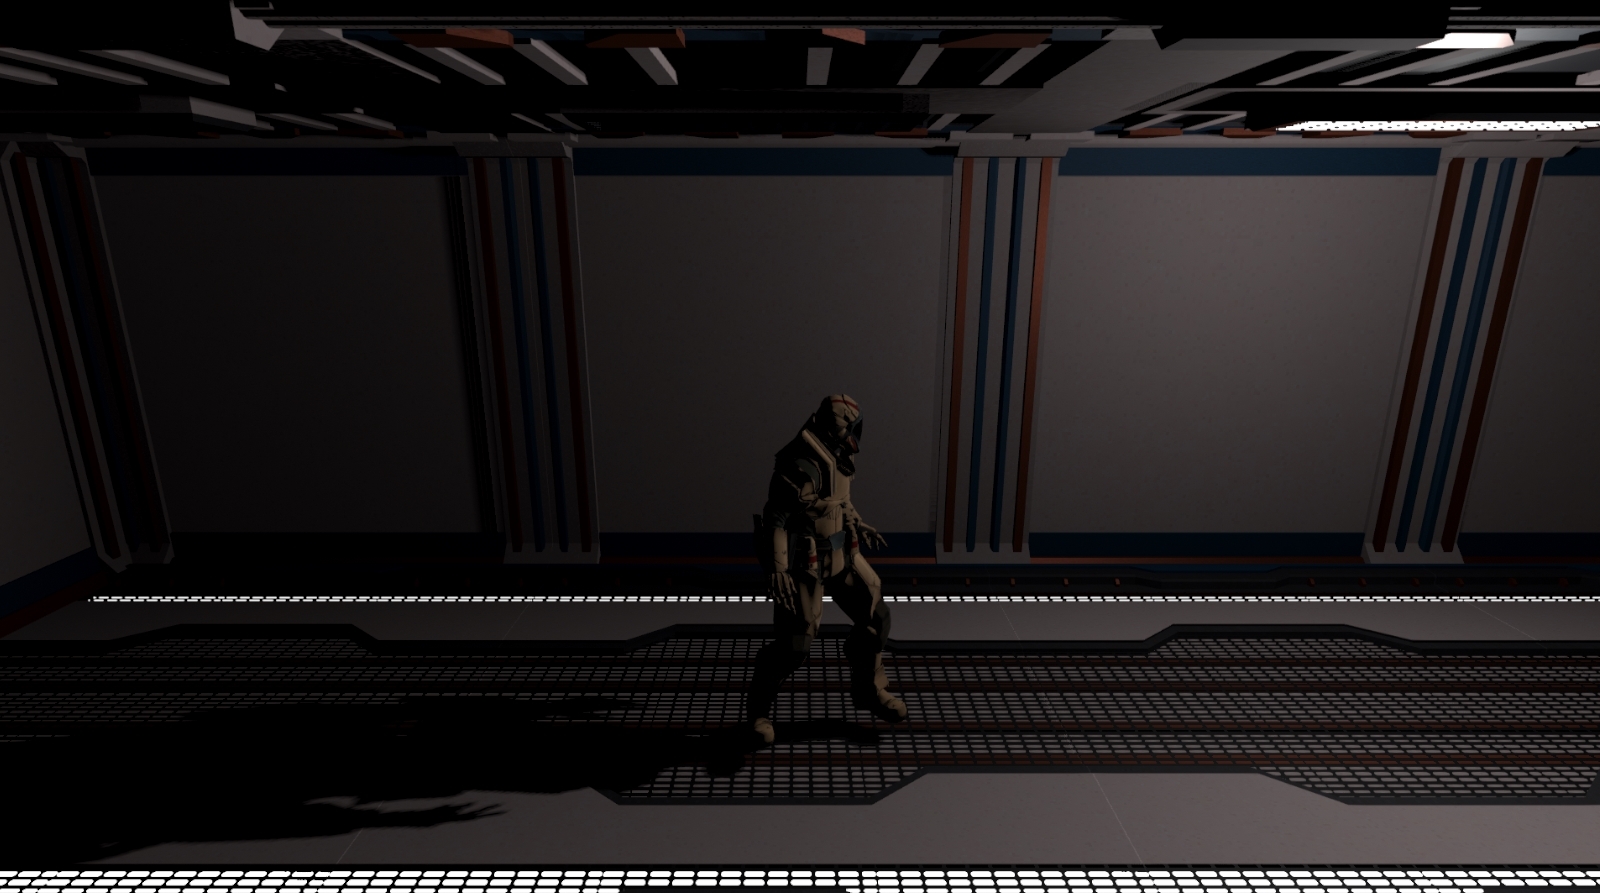
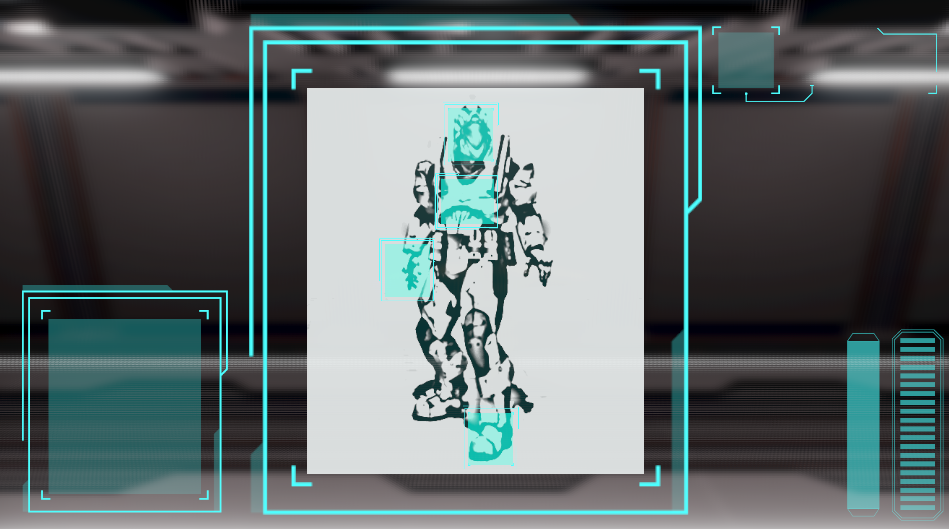
To do a better process decided to thing at the start the GRAPHICS and SCENARY, with some Modular and Scifi Sceneary pack i have, think in the camera and POSTPROCESSING to create a great visualization and work with that from here.
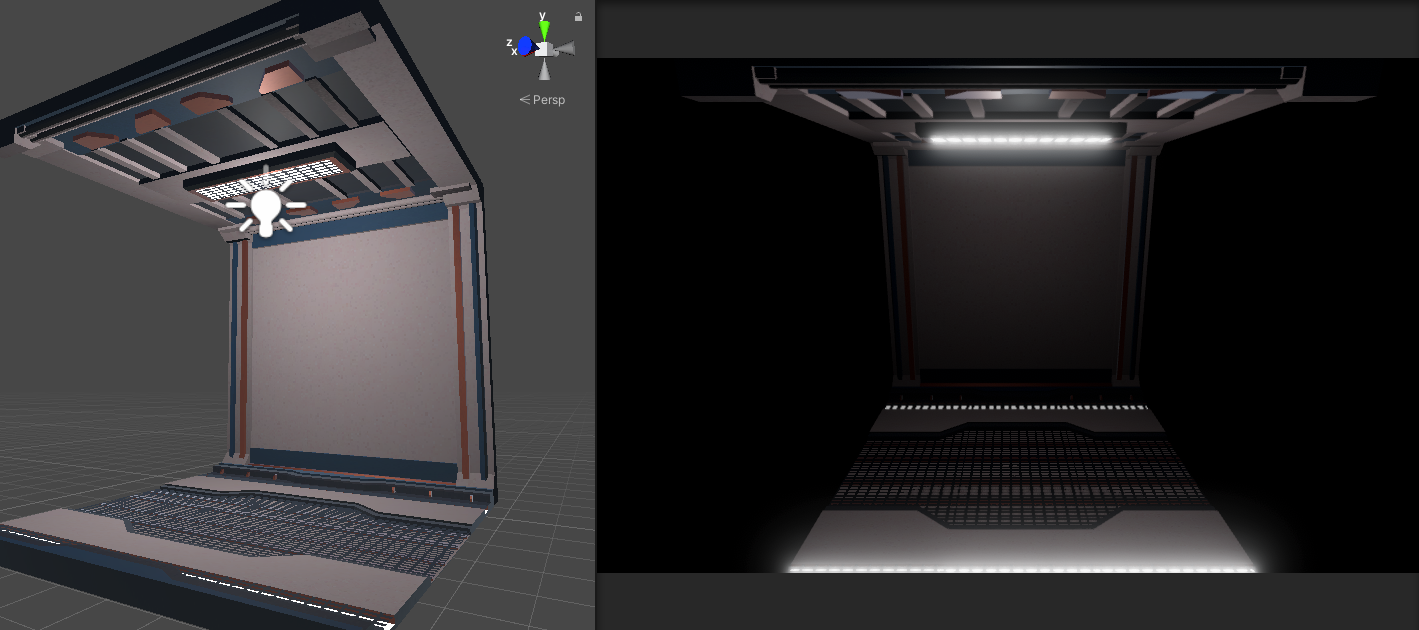
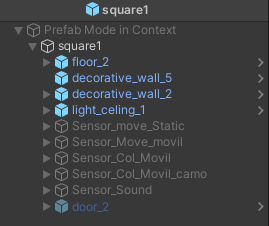
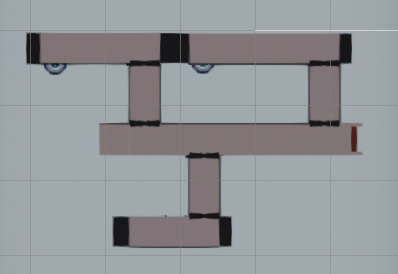
like you can see the square only has roof, ONE WALL and the floor, this is because the other wall will never be seen, this is the angle where the camera will be, for this third person view. Other thing is, i decided to work everything from prefabs, so i can easily manipulate many things instantly and off course individually too, how to see the image that square was the begining, with the ligth control so i can decided witch square has light or not.

with this i can create the levels more easily, but first had to complete all the things this will contan.
Next is add the character ans test the lighting, i create the basic movement with the CHARACTER CONTROLLER, but only working with the HORIZONTAL axis.
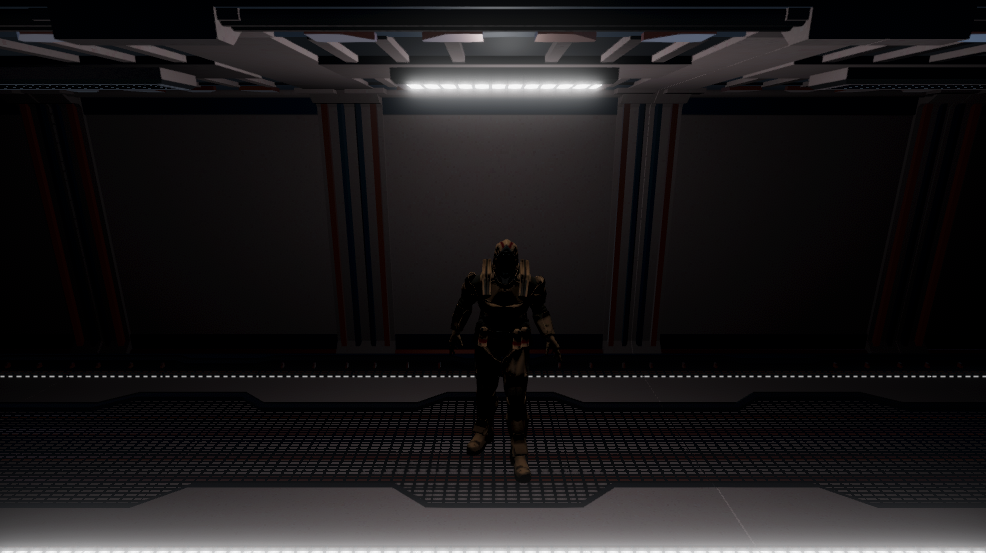
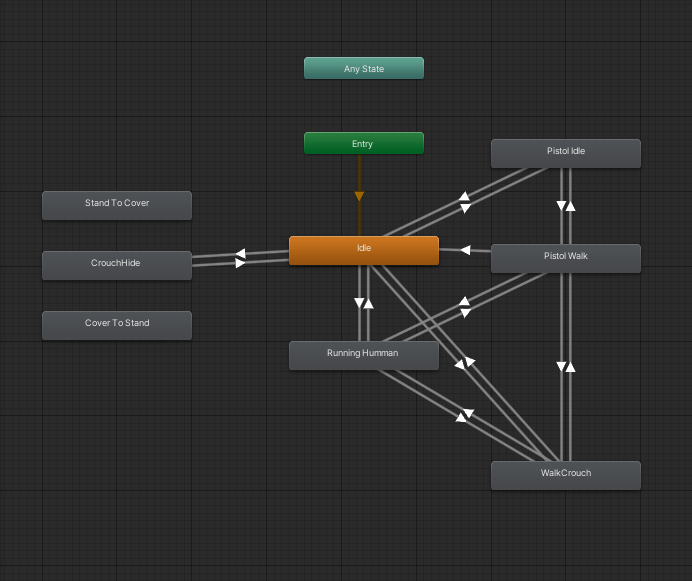
i really love the looking of the game soo continue with the character, principally with the animation controller, this time decidedd to use the animations from MIXAMO, this helps so much with the time and i dont need specifics animations like others projects before.
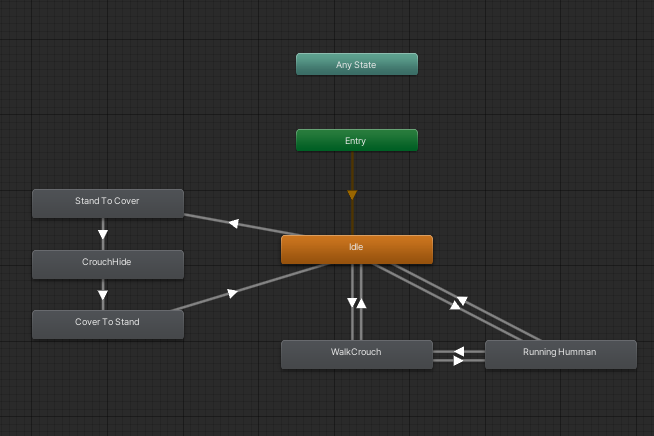
this was the first look of the animation controller, tested until like the result and continue with other part, one of the hard part of this game.
something early to work was the sound, but i reuse the steps method used on BREAKABLE,
THE GUN mechanic
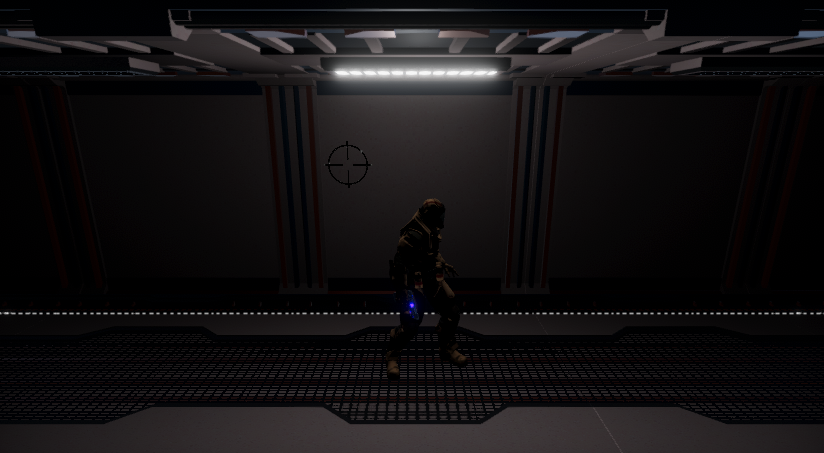
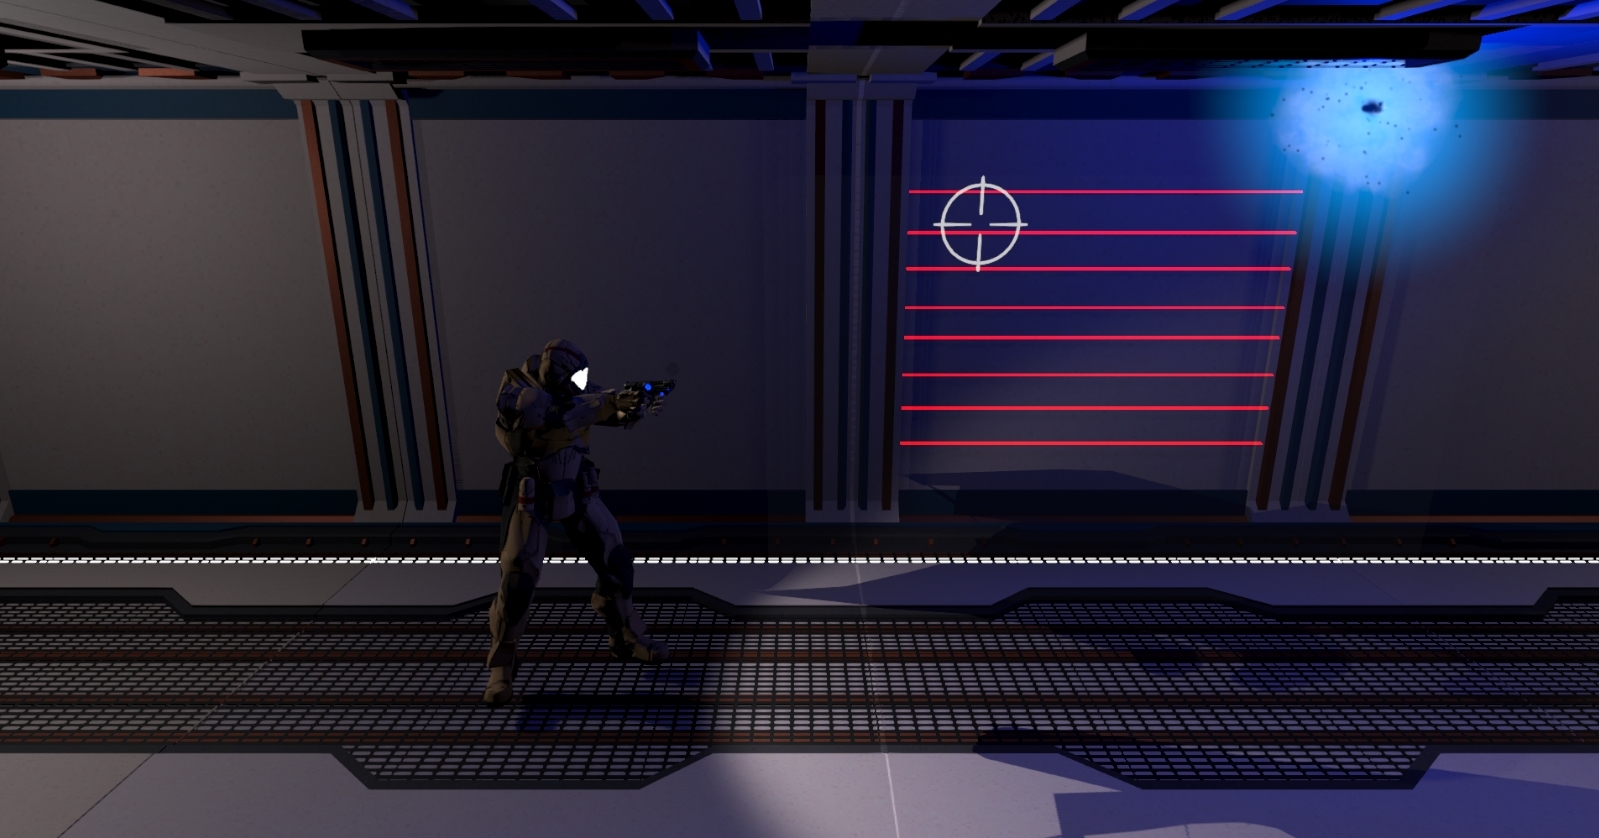
the first part was to move the aim in a canvas world attached to the player, the aim will folow the mouse, so you will be aim more easily.
Day Two
This day was to continue the aim and the others habilities, principally visual and later embrace them and off course funcional.
The hard process in the aim is to limit the aera of movility of the aim and off course this will limit the shoot areas, but was succesfully completed with this code

with these we succesfully limit the movility of the aim in the canvasworld and get this result

and off course for this part was alreadyedited the animation controller, so it can work with other movility, with the gun and a crouch or hide animation edited to be more simple.
the next one was not very hard to code, the Flashlight and the CAMOUFLAGE, this mechanics comes to me this day i really lve, i better when there are some shaders easiy and free to use x3, those are the results
the mechanics was simples to code, a light in the head and replace the visor material for an emision one when the lights is on and viceverse, with the camo was the same, when crouch or hide, replace the body material for the shader material.
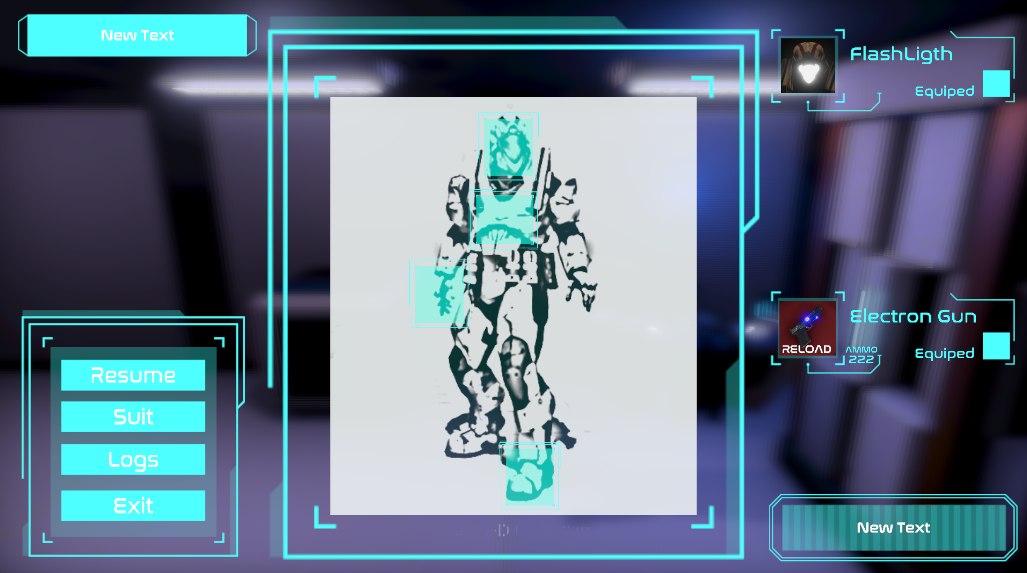
with these now i try to test and try the CANVAS, where is planed to be some info and manipulate part of this mechanics
the idea was first, similar to SUPER METROID, you equiped or not the elements, so if you can use it yo must equped by menu, if this section is not equiped so you can use it.
Day 3
Here i continue with the CANVAS section, i complete the design idea and for now i used the images i get fom some examples and things on my assets e.e
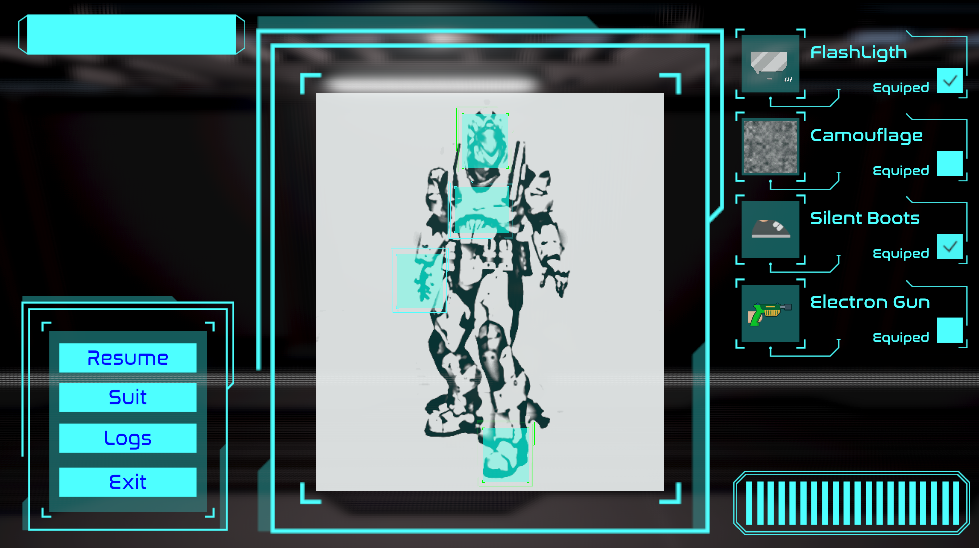
here i put the things i wan to use later, the 4 elements you can equip or not, the resume and exit methot and a LOGS section like the Metroid prime, so you can read or learn about what you find in the way.
Now comes other part of the paper where think in the hazards and the static values
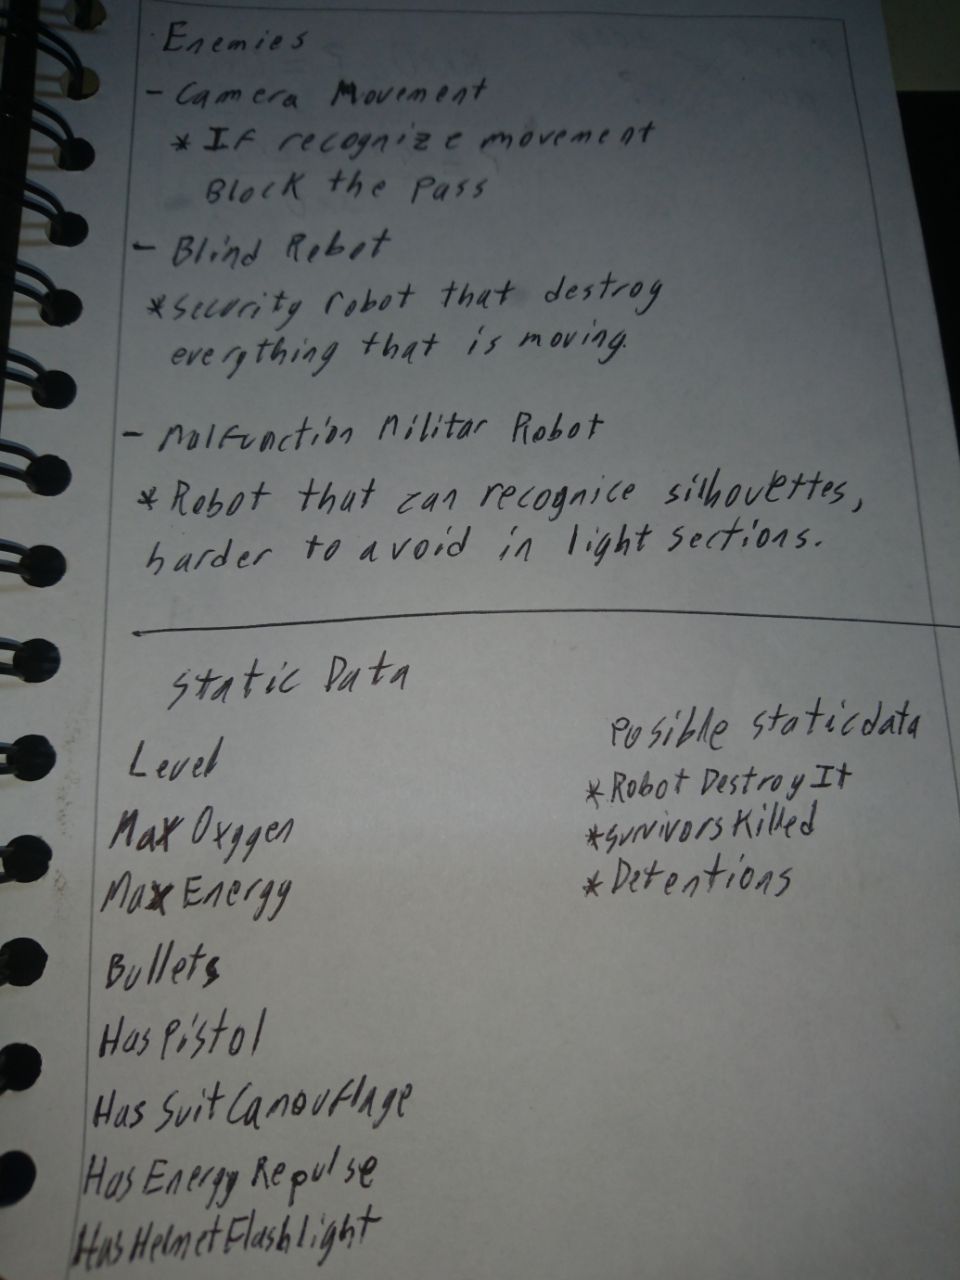
whit this now is time to enter again to code, this time with the STATICS values, like you remember i loveto work with these cause make it easy to make a change and alter many sections or things without so much code or conections
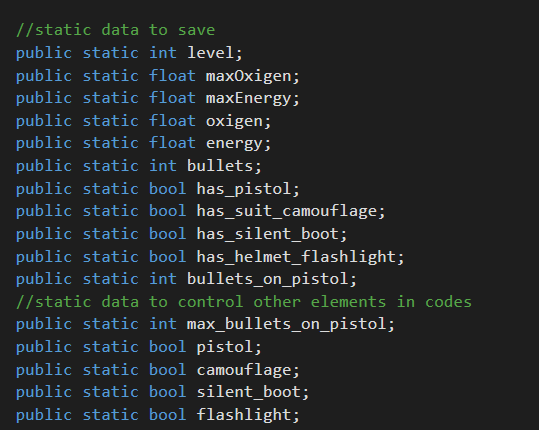
this was the beginig of the STATIC DATA, the idea is to use two limits for each element, the first one is if you found it or installed this element, this will limit the option to activate it on the SUIT MENU, and the second is if you equiped that element, so if you have it but dont equiped, you will not access to that, with both of this conditions depends if the elements or weapons appears in scene too. like these examples results.
with this pass to upgrate the pistol code and leave it a better way.
Time to create the shoot code, there are two thing to take in mind, the aim work with this, so the journey of hte ammo should be between the pistol and the aim, the second is the directtion, the ammo must go in the direction of the aim, like this
This one was succesfully with the LOOKAT transform
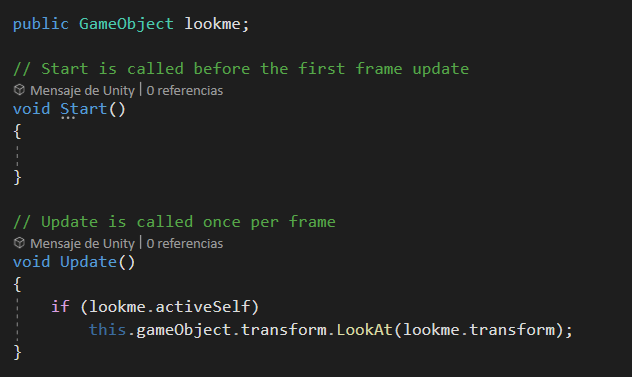
and why this?, well this is necesary to know the ROTATION of the bullet before INSTANCIATE the ammo.
so now is the FIRE CODE process
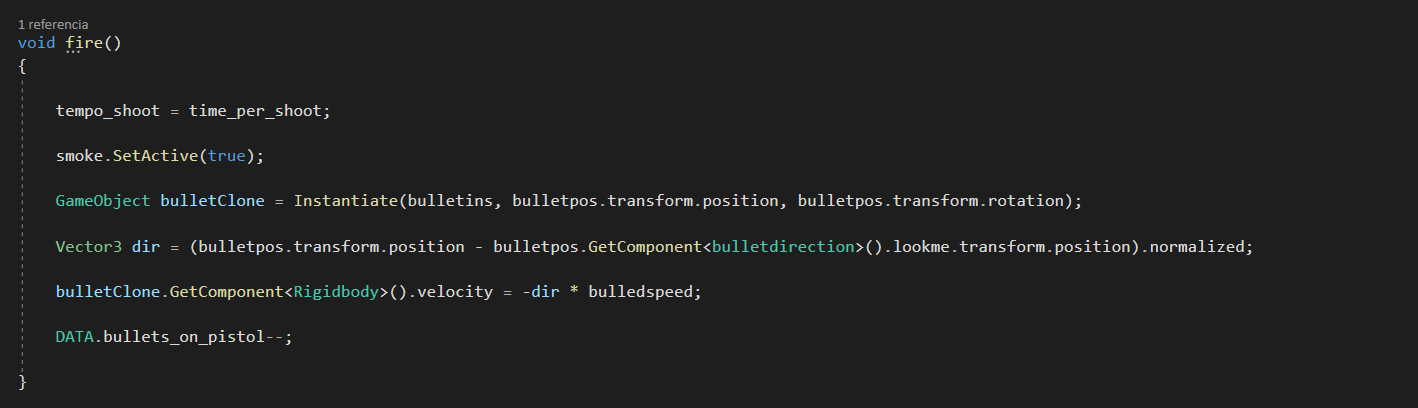
first we set a time, used to destroy the bullet later, later comes an effect of smoke, there comes now the INSTANCE process where whe use the bullet pos and rotation from the previus example, and create a vector direction between the bullet and the aim, this will be used to add to the rigibody and make the bullets shoot to that direction selected and whit the correct rotation, likes the bullet comes from the gun e.e
finally we do some values minus to the DATA and end the process, to get this result (with already some effects added e.e)
Day 4
here comes more paper to start thing in the principal hazard of the game, the energy and oxygen.

and something very usefull for a unity programer the RULE OF 3 e.e
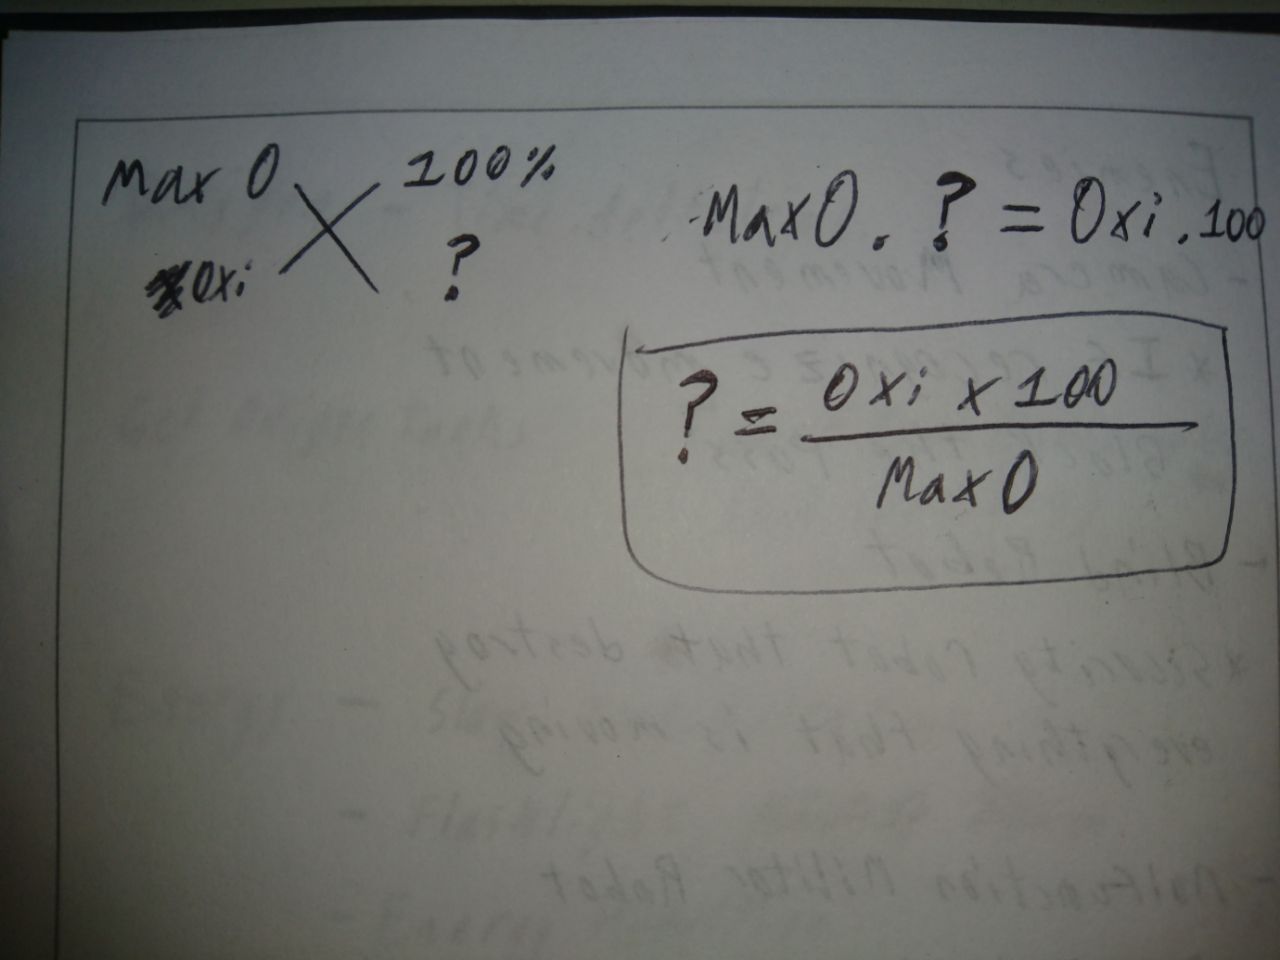
very usefull to get values in the process, other rule very usefull is the LINE FORMULA, this methods i use them for example with the IMAGE FILTER, if i want that a value control the filter of an image, or in this case, to show the % of the data.

implemented by code like this

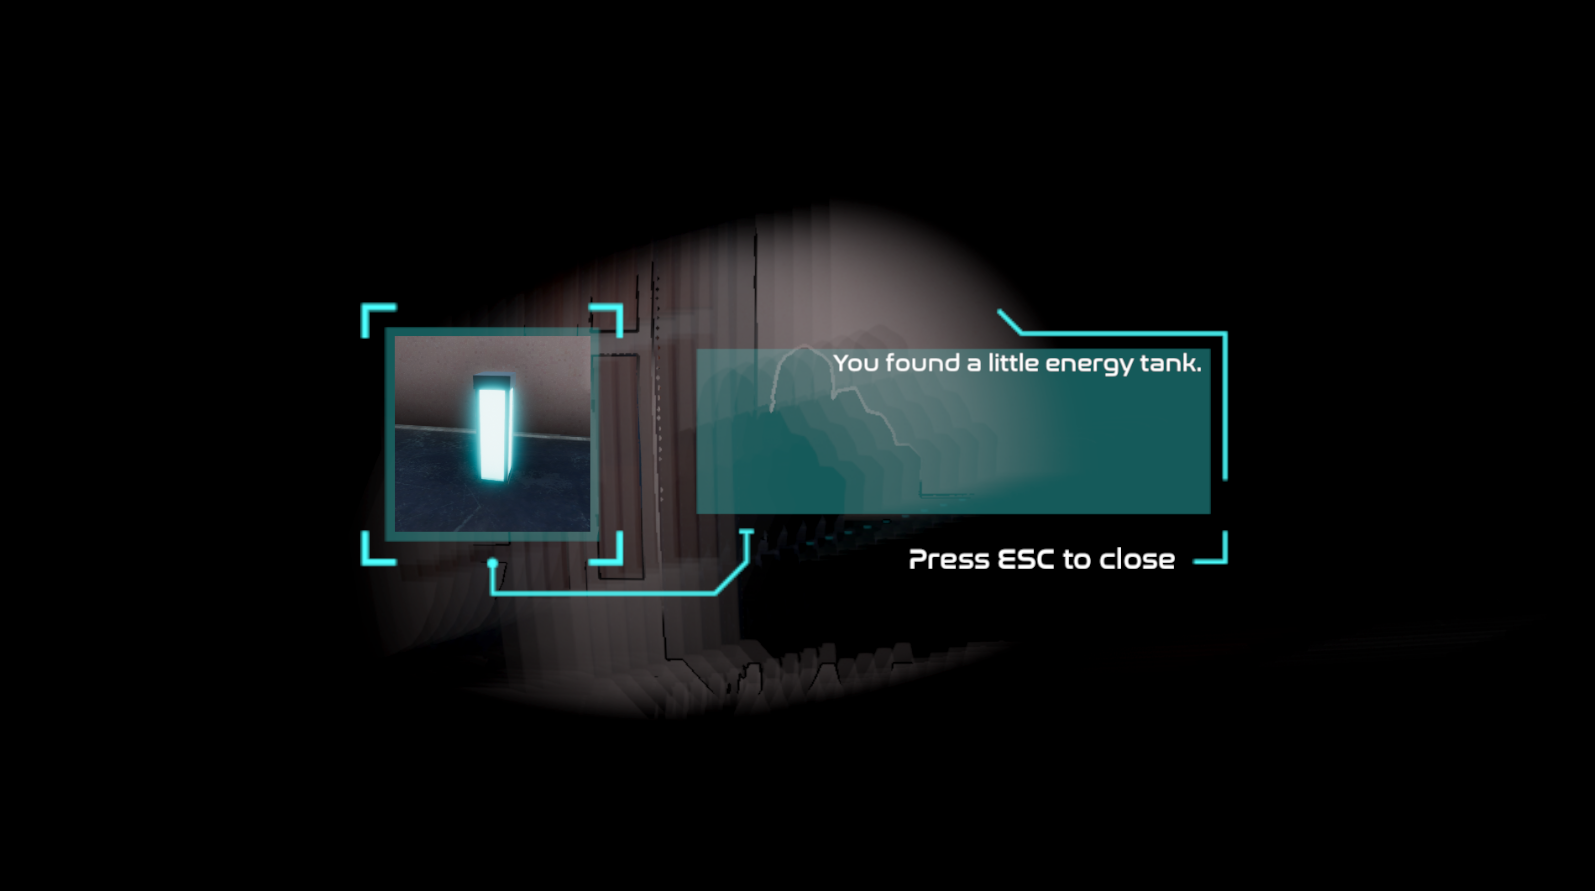
with that part implemented is time to create the objects you can get on the world to gain some energy or oxygen, elements of TRIGGER, this game have a lot of trigger codes, the player is already ready and here comes the interactions of the player with the world and enviroment.
decided to add an animation, a tempo before FREEZE the camera and add an effect to a RENDERCAMERA that appears in canvas, added a BLUR effect and FISHEYES with the help of the ALLIN1SHADDER, is free on unity and can be used well in spriterenders, images and in rawimages.
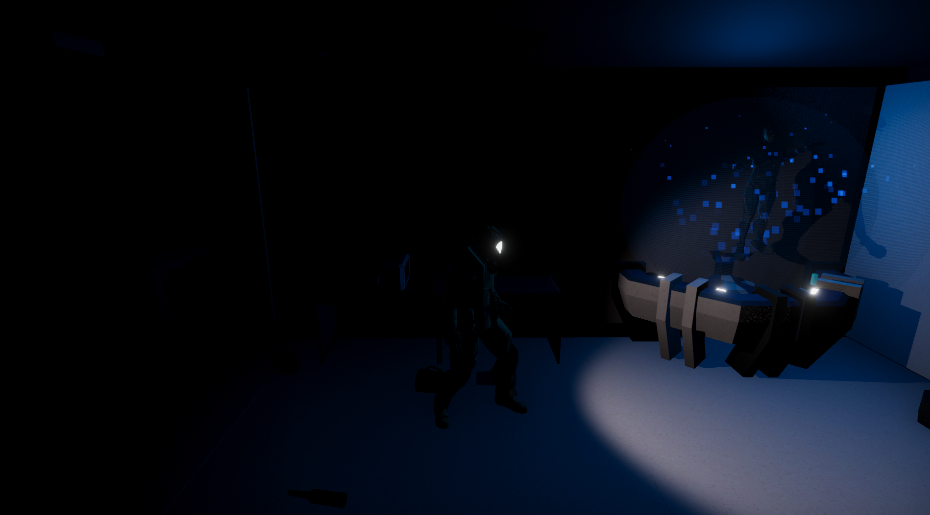
that means that is time to continue with the enviroment and start to make the place looks better and a little creepy e.e

decided to test with the first element you can get, the flash light and think the places where you can installed an how will shoy it to you
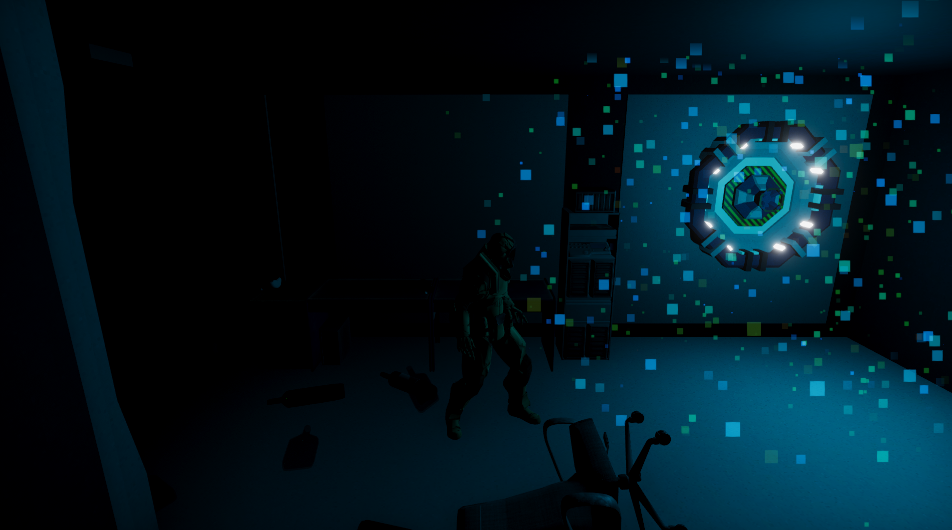

i continue the day adding things to the enviroment and leave, this was a day of art and little code e.e
Day 5
Today i continue the coding with the objects you can get so this one affects the statics values
this was created by this code
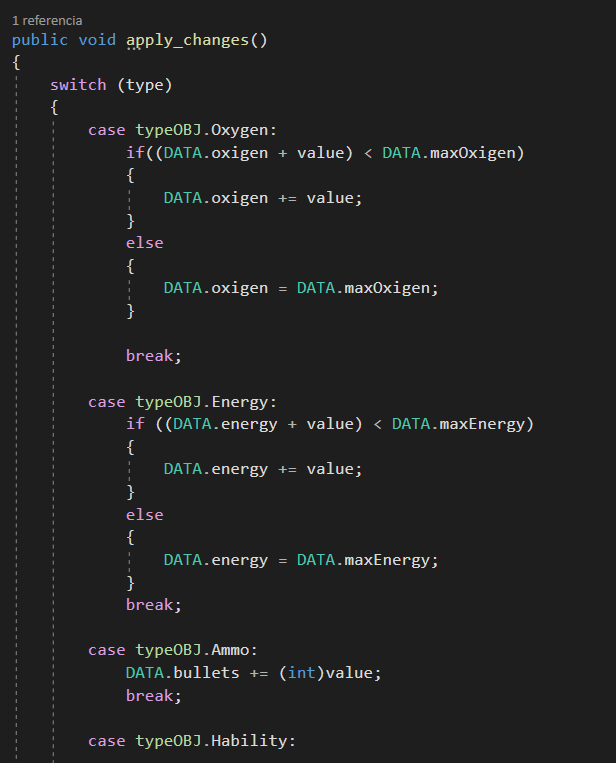
like you see, i only work now altering the statics values, and use them in the others codes more efficiently
and comes the time to work in the other hazards, at this time was hard to focus in create AI and the robots, so what to do if the robots was the principal idea of the game, comes the solution of change the game history, at the begining was to escape from a malfunction system that corrupted the robots and system, now comes the new history that takes sense when you complete the last level, this is a facility controlledb y robots that test with humans to evaluate his logic and others things e.e, like the maze runner or divergent movies but, this ones are controlled by robots and maybe you are clones or humans ecuvated like matrix with the porpuse of science, like rats. More creepy and dark like the netflix serie xD
anyways, with the history rewrite it comes the new hazard more easy to create in less time, the sensors and functions.
This come like this (here comes some tutos if you want to complete more easily the game)
- Blue Sensor Static
*Big area checker (all the square)
*Detects Movement (that means activate if the HORIZONTAL AXIS != 0)
*Dependence of LIGHT (Works correctly only with the light above working, if the light is broken or shut down, detects only FAST MOVEMENTS, that means that activate only if you are RUNING)
-Blue Sensor Moving
*Small Area Checker, but moves across the square
*Detects Movement (this one can be avoided if you stay still while the sensor pass over you)
*Dependence of LIGHT (This works equals like the BLUE SENSOR STATIC, no lights only recognize when you are running)
- Orange Collision Sensor
*Small Area Checker, but moves across the square
*Detects Any collision (this one can be avoided if you hide in the wall while the sensor pass across you)
*Dependence of LIGHT (Works correctly only with the light above working, if the light is broken or shut down, detects only movements, that means activated if the HORIZONTAL AXIS != 0 )
-Red Sensor (Niight Vision Colider Sensor)
*Small Area Checker, but moves across the square
*Detects Any collision visible (this one can be avoided if you hide in the wall WITH THE CAMOUFLAGE ACTIVED while the sensor pass across you)
* This works correctly with or without light
-Purple Sensor (Audio sensor)
*Big area checker (all the square)
*Detects Any medium sound made in the area (this one can be avoided if you walk with the SILENT BOOTS, running still actived the sensor)
*No light dependence
and all of them are implemented i the SQUARE prefab, so i can activat them when i need in any part of the map
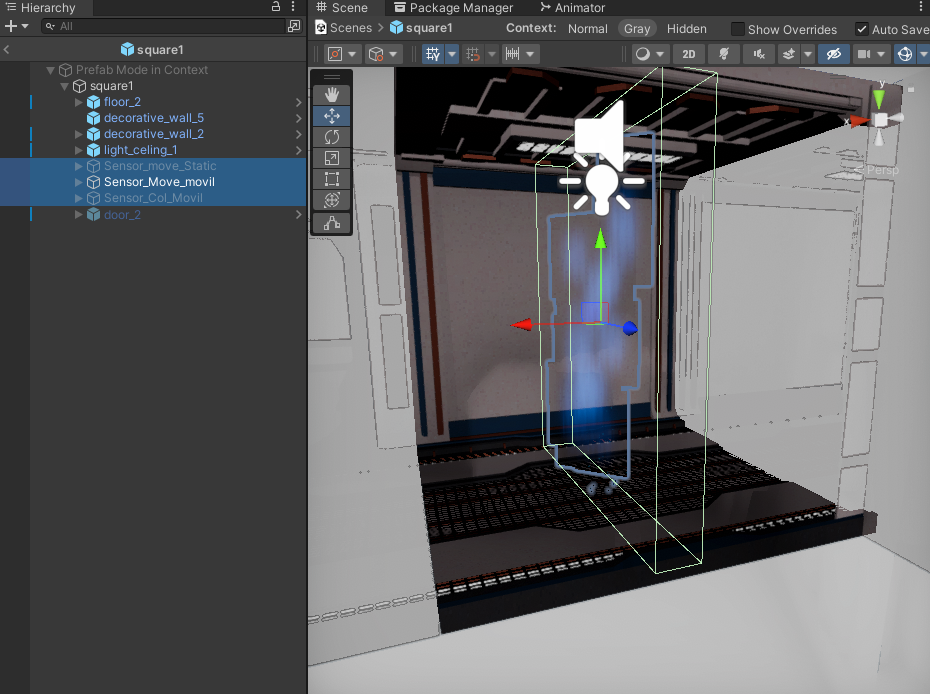
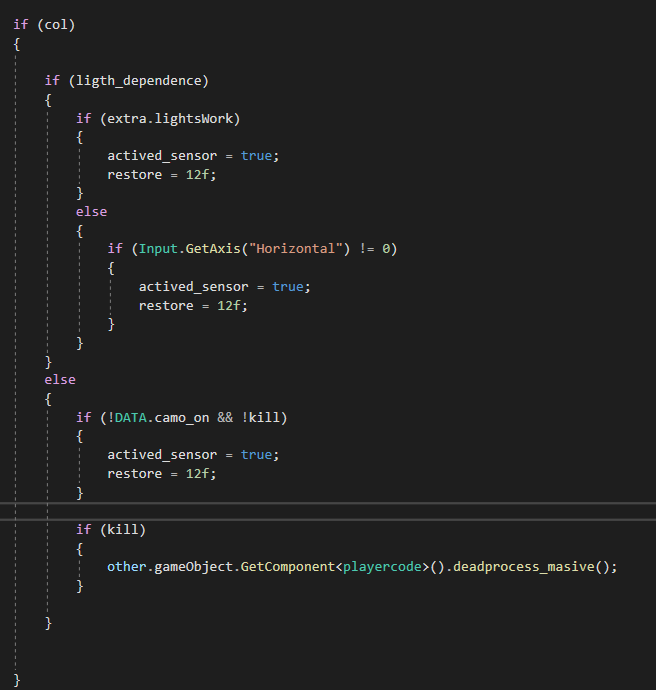
and all of them was programmed in a trigger code that depends of the public values checked in the EDITOR
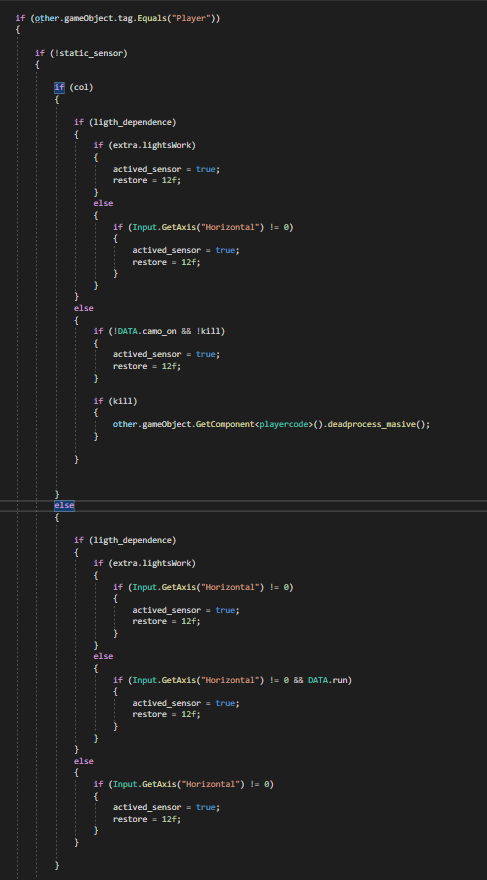
And what activates each sensor, a door that block the progress for 12-15 seconds, why?, because the sensor animations take almost 10 seconds to go and return, this was a bug solution where, you can activate some sensors and wait until the door opens and continue e.e, with taht tempo, FIRST, you lose time, ENERGY TIME and OXYGEN TIME, and second, that make the sensor to REATIVATE so if you want to pass the door must think well how pass it without activate it.
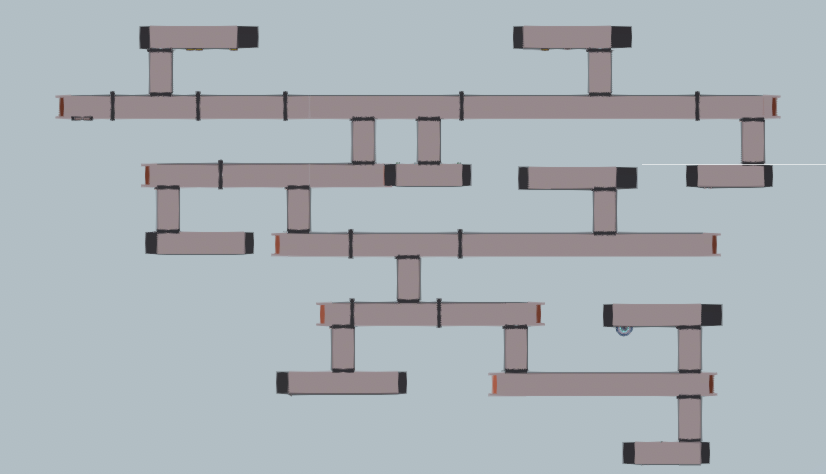
and with this square coded and easily replicables comes the scenary construction
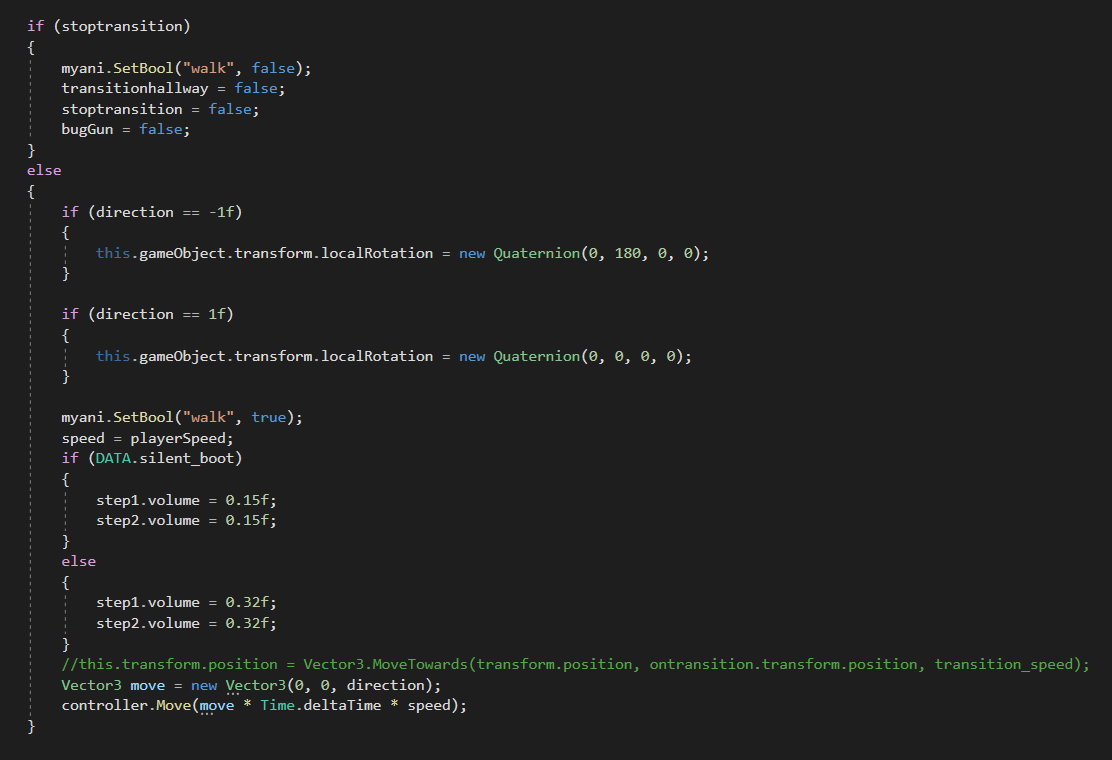
start to implement the map idea, here comes the HALLWAYS code, where you change pressing W or S depends of the trigger activation, what to do?, you press and activate a STATIC VALUE that prevents the other interactions like move HORIZONTAL or ELEMENTS USES, this process is to avoid BUGS, we move automatically our player trow the vertical hallway, until reach the end of the trayectory, at the end we, reubicate the transform of the player, because we move it without the CHARACTER CONTROLLER, and try to avoid the return of the character to the original position.
This was the extra move code created
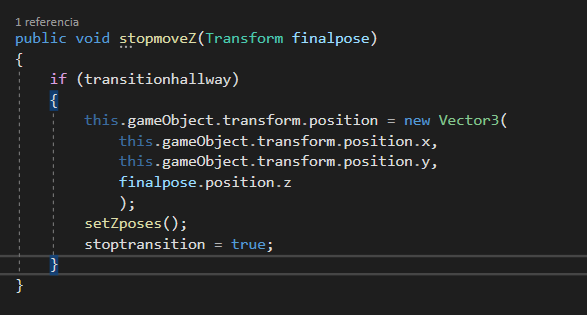
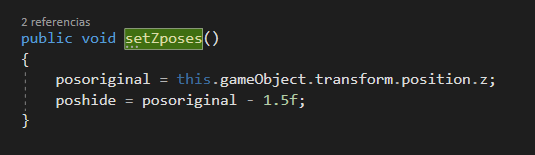
and this was the code created to solve the position bug, when the character reach the destination TRIGGER, we activate this code
with this complete the movility mechanics of the game, and decided to create the CRYOSPHERE, where put the second limitation, PRICE OF FREEDOM, i want to create the game POSIBLE TO COMPLETE, without taking the energy and oxygen of the machines, but will be more complicated cause you need more precitions and use weasily your elements and actions, to conserve well your OXYGEN and ENERGY.
this was the design idea ready to start the code process
Day 6
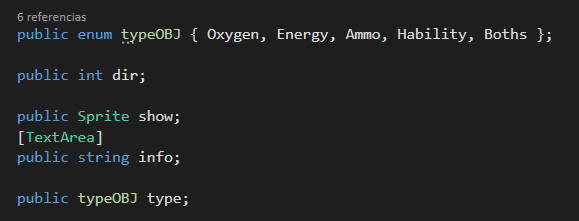
To continue with the CRYOSPHERE code, just make some changes to the OBJECT CODE, so now there is a chance to get two values in this element, in that way all the code previusly create it still work with this new implement.
this was very easy using the ENUM VARIABLE, this helps a lot to create an action to specifics groups using the same data on editors to each group specified.
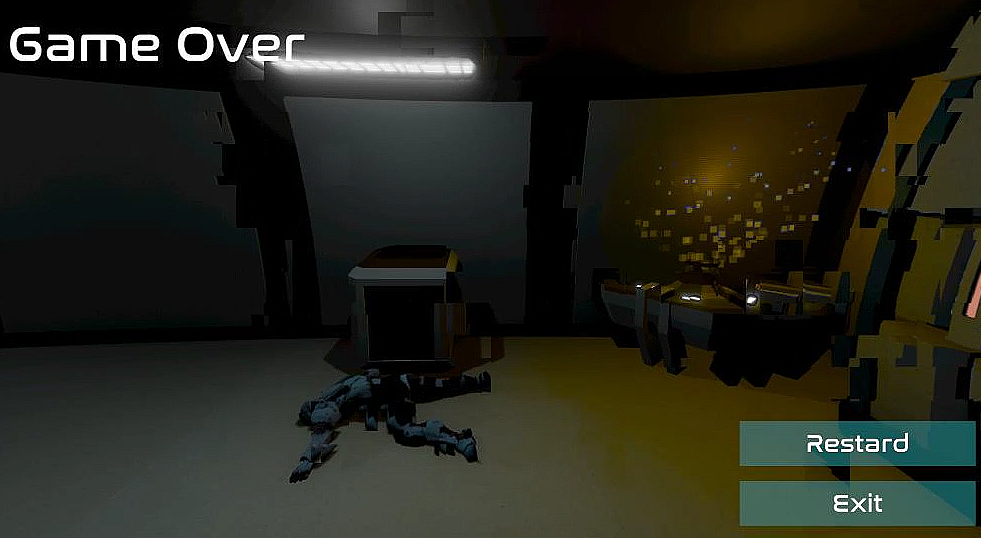
with all the object already coded, comes the GAME OVER CODE, the first one is to create the canvas for this action, for this i had TWO CAMERAS on world, one for the game and other for render texture, this is because the render texture is altered by some ALLIN1SHADDER effects, for others parts of the game, like pause, objects founds and now, game over scene. For this one i decided to add aGLITCH effect and HUE SATURATIONS, so i can obtain this result.
with the canvas already created comes t code the ways you can die.
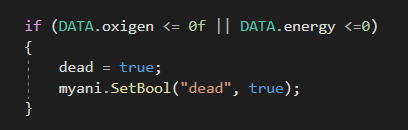
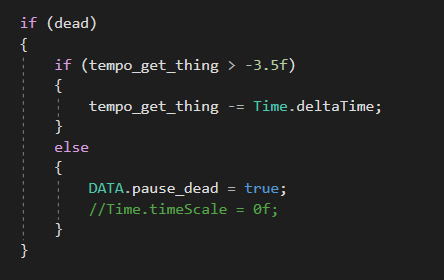
Firts is the oxygen or energy tanks empty, like our CONTROLVALUES CODE change constantly the static values for these tanks, we can put the controller on the player, if some of those reach 0%, your character will activate an animation, and later the canvas apear, to avoid bugs, we create another STATIC VARIABLE DEAD, if dead is true you wont control or do anything with the character.

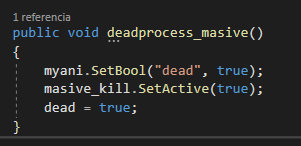
and now, is the second way you can die, at the beginnig was killed by a robot, but like the game idea change, now will be killed by some LASERS, thera are two, like the sensors, static and move in, this use the same specification to the SENSOR COLLISION CODE, but we add a new boolean, the KILL BOOL, like the orange sensor, you can avoid it if you hide in the wall, so the laser are only evade it with this action, and the static are on the wall so is the oposite thing, you cant hide on the wall in that section.
and yes, there appears an action called DEADPROCESS_MASSIVE e.e
this is because in this method you will die and activade a blood effect like you were cut in in parts, a little of gore to this game, well, the idea was to create an eviroment like SOMA but in 2.5D, even with the blood has to reduce the work, for example, i get the effect of blood disperstion but y want it to paint the character and the bllod stills in the floors and walls, but the time dont let me to test and work this e.e
and finally get this result at the end.

and the flood effect was created with a VOLUMETRIC BLOOD FX, using a package i own on asset store, this one is not free, but is really cool and usefull to give some gore to your games.
this indicates that all the things in the game are ready, so is time to complete the level 1
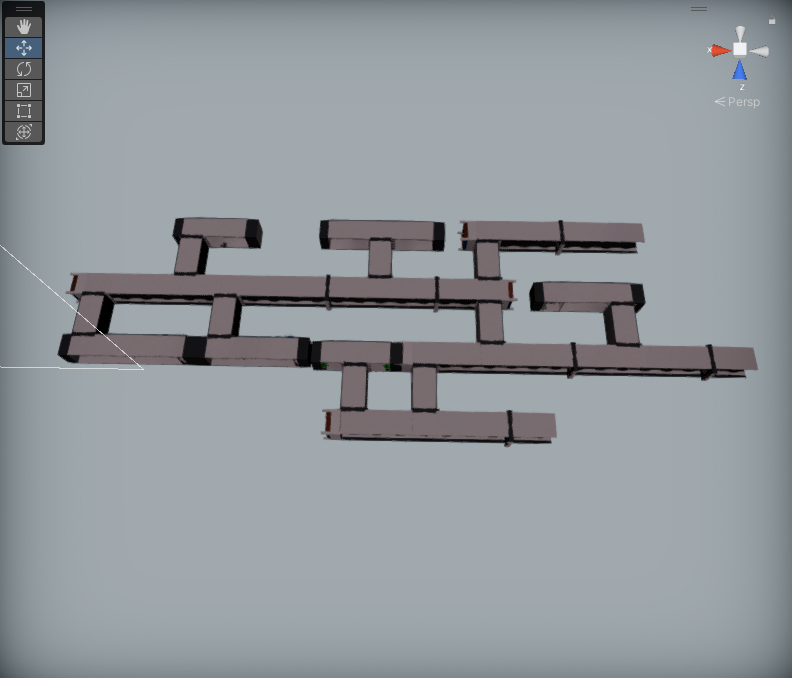
like i said before, all the things are prefabs and the hazars and sensor are activated by the unity editor, so is more easy to create an plan the level at this point, other thing to start changing is, the CANVAS ART, start to replace the TESTING IMAGES and change it to the FINALS SPRITES.
Also, at this point i quit the static values implemented on the player, why?, because those are altered by menu or the end of this level to the level two.
these are all the STATIC VALUES USED ON THE GAME
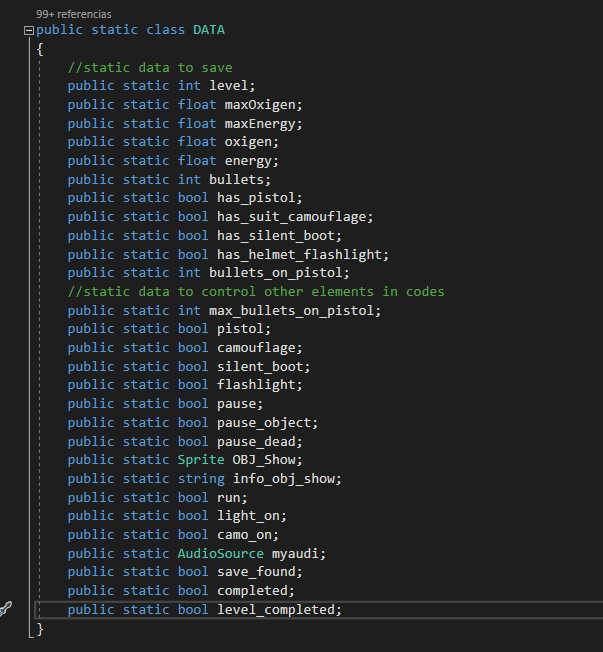
like you see, there are two groups, one are used to alter or control many things on the scene, BUT are not esential to save because those values depends from other scene values ot static variables, the other group are really essential, because if there arent created the game will not work propertly.
the game is this
INTRO PRESENTATION (logos)
MENU (here we can start a new game or continue our game IF there is a game saved, if is NEW GAME, we start the static values with the initials values and save)
LEVEL 1 (here you can die only by tanks and energy, but like before was created the SAVE DATA and STATIC VALUES, the game initialize well, if you die can restart and start with the values saved, if you complete the game, we SAVE again with the values that already has at the end of the level)
LEVEL 2 (here you can die by tanks empty and fro lasers, but can easily restart with the values saved, if you complete the game, we dont save because here is the end of the game, but we alter the COMPLETE static value)
FINAL SCENE REVELATION (This scene is a cinematic, where you discover that you are a rat experiment, manipulated by robots that are testing your logic and mental skill)
DAY 7
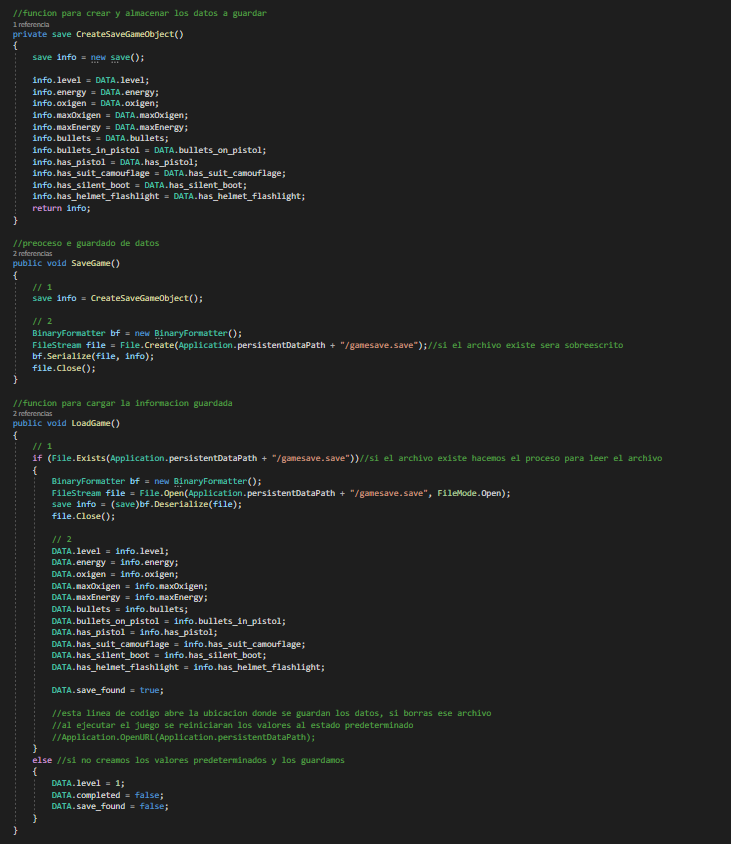
Here comes the ending of all, we already created it the save control and is already working (the image before is the save control progress)
Here comes the SOUND WORK and ENVIROMENT, we need to give the areas more life with objects and thinks, also the sounds, a bucle soundtrack and sound effects, for the GUN, EXPLOTIONS, DOORs, ALARMS, etc
Here comes to the time to add some EASTER EGGS, some of them are only visible an others are objects that you can take.
Here in the devlogs will SPOILER these elements xp
* Only one element visible without interaction, some FIVE NIGHTS AT FREDDYS toys you can find, looks amazing the idea of those robots in the game
*there are three EASTER EGGS you can take, because are ELECTRICAL OBJECTS where you can take some of that energy to your suit but are 3D OBJECTS AND 2D IMAGES to the obtain menu (Gameboy Color, GameBoy Advance and a Zapper)
* there is and ARCADE ZONE, full of ARCADE GAMES and this section is VISUALIZATED in 258 BITS, like some 2000 gamesm when a 3D game is adapted to some less powerfull consoles
with enviroment completed and others ambients things comes now two more things, end the second level where you must get the SILENT BOOTS and the CAMOUFLAGE.
the code of those elements are ready coded and the obtain method too, so is only use the PREFABS to create the second level, the level was ready and completed in just like 1 or 2 hours.
and yes this one is more extend, but the idea is that the game could take at least half a hour or a little longer to complete, that off course taking in mind that the RESTARD button, RELOAD the scene and start from the beginning, in this method is where the save data is usefull, so you can restard with the variables needed and without the altered created in this level.
also, now comes the integration of all the scenes, some time to work with the SCENEMANAGEMENT and integration with the SAVECONTROL and STATIC DATA.
dons sound hard to be honest, before we call the load scene, qhe must create or alter the DATA, and save them, when the other scene LOAD, we LOAD the SAVEGAME and put the STATIC DATA with those values.
at last part, i create more things to the menu, the CREDITS SECTION, where you can see all the integrants, principally because use things that are free or buy it on asset store, all of there must be credited. Also created something the game interact with the SAVEGAME data, depending of the LEVEL saved will appear a menu scene different, and if you complete the game, will appear another scene, this is like another easter egg, inspired in the HALF LIFE 2 menus, where those changes depending of the level you are playing.
SOME EXTRA INFO
*Like you see at the beginning of the pause menus, there was a LOGS section, this was there with the idea to appears info of the SENSORS and THINGS you find in the game, like the METROID PRIME series and the scan info, this would be usefull to give you more info about the sensors and enviroment, but was discarted for the time productions.
*The robots still be n the game, but now are part of the revelation so you will understand the idea at the end, is a darker representation of the humans with others animals used for testing, here the robots tested you to get or understant more humans things.
*The cryosphere are the PRICE OF FREEDOM, because taking that human life for some energy and oxygen can be very usefull to survive and continue, with the idea of a experiment, this will be taking by the robots to undestarnd more humans decitions (this wasnt programed, but the idea was to get a different dialog at the end depending of the decitions taked).
*At the end one things hard was the lighting, getting some error where the scenes loads medium lighted and makes easy the game to pass without the FLASHLIGHT, this was solved puting all the emision light to none, there are only visual but wont interact with the enviroment, the second was the autogenerate lightmap, this makes the game constantly change.
before end the game comes the testing, here i play the game in two computers to see if its work fine, check difficult and buggs, the consume of tanks was nerfed and the tanks obtains was buffed so is not to hard to pass if you decided not to kill the humans on the cryosphere.
At the end i start the art work, for the icon, the title and others things, the game idea comes from the artist song album, it was called PANDORUM, you i decided to called like PROJECT PANDORUM, sounds weird like and strange language that could symbolize something different, and like this are tests, is good to be called a project or something like that.
With this complete the game and publish before the dead time, hope you like it and enjoy the game, and if you read all of this, hope you like it and understand a lttle my method of work and maybe learn something you need or dont know x3

Leave a comment
Log in with itch.io to leave a comment.